Lab 2
Wifi-Controlled LED Stoplight (Arduino)
Online Link
This lab is available as part of my online portfolio at: https://www.lehi.dev
Objective
The purpose of this lab is learn how to create a wifi-controlled stoplight using Arduino. These principles include:
- Install and become familiar with Arduino IDE in order to use in conjunction with Wemos D1 Mini microcontrollers.
- Enumerate requirements from use case and user stories.
- Develop a minimum viable product and refactor it to account for new requirements.
- Learn and use Github private repository and share it with a specific contributor.
- Become familiar with representing the desired system by using flowcharts, state diagrams, etc.
- Compile and upload program code to from Arduino IDe tro the Wemos D1 mini.
- Learn to plan what materials will be necessary to accomplish the system’s purpose
- Become familiar with coding in the Arduino (modified C language).
- Become familiar and learn how to use Arduino-based microcontroller to use GPIO pins. to control LEDs.
- Learn to run a server using sketches to connect D1 mini to wifi. Build a server that accepts rest protocol to change Arduino GPIO stoplight state and LEDs.
Materials
- Personal Computer
- 1 x Wemos D1 Mini microcontrollers (ESP8266)
- 2.5A USB Power Supply with micro USB Cable
- 1 x breadboard
- 1 x Red LED
- 1 x Yellow LED
- 1 x Green LED
- 3 x 220 Ω Resistor (RRBlBlBr)
- Arduino IDE
- Fritzing
- Jump wires
- Soldering iron
- Solder
- GPIO pinout guide
References
The following resources were used in this lab:
- https://www.youtube.com/watch?v=G6CqvhXpBKM – Great tutorial on how to use Arduino IDE with Wemos D1 mini (ESP8266).
- https://app.pluralsight.com/library/courses/arduino-introduction/table-of-contents – Pluralsight course on how to get started with Arduino.
- https://learningsuite.byu.edu/plugins/Upload/fileDownload.php?fileId=70f7d913-ioSF-xMVW-I06U-m67a1cc00e96 – Lab write up example.
- https://github.com/todddb/example-lab/blob/master/example-lab/example-lab.ino – Greate example on how to get started with Arduino and get a server up and running.
- http://www.esp8266learning.com/wemos-webserver-example.php – great arduino webserver example.
- http://www.instructables.com/id/Programming-the-WeMos-Using-Arduino-SoftwareIDE/ – programming wemos D1 mini
- https://www.w3schools.com/howto/howto_css_switch.asp –
- https://www.arduino.cc/en/Main/Software – Arduino IDE software download
- http://fritzing.org/download/ – Fritzing is a great tool to visualize electronics prototype.
Procedures
- Solder the pin attachments through the Wemos D1 mini in order to utilize the breadboard and jump wires and LEDs
- Download and install Arduino IDE from https://www.arduino.cc/en/Main/Software
- Install CH341 version 1.4 from the following website: https://kig.re/2014/12/31/how-to-use-arduino-nano-mini-pro-with-CH340G-on-mac-osx-yosemite.html
- Add Wemos D1 library to the Arduino IDE:
- Arduino > Preferences > (in addition Boards Manager URLs paste the following: https://kig.re/2014/12/31/how-to-use-arduino-nano-mini-pro-with-CH340G-on-mac-osx-yosemite.html)
- Tools > Board > Boards Manager > (search for “esp8266”) then click install.
- Tools > Board > “LOLIN(WEMOS) D1 R2 & mini”
- Then selected the connected arduino by going to:
- Tools > Port > /dev/cu.wchusbserial14510
- Used the Arduino IDE to develop the code for the stoplight.
- Used the Arduino GPIO pinout to decide which pins to use for this project from https://pinout.xyz/.
- In version 1 I wanted to design a system that all it would do was to turn on the lights according to the pins that were on.
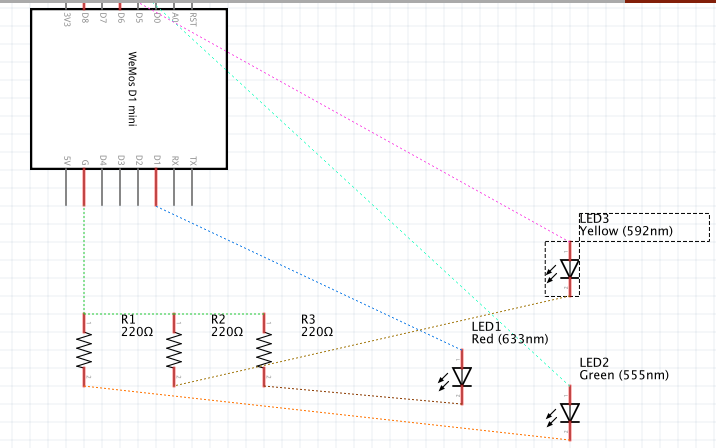
- I Chose the following pins to be on:
- Pin D6: Green color
- Pin D8: Yellow color
- Pin D1: Red color
- Pin G: Ground
- I Chose the following pins to be on:
-
- I had one Ground pin from GPIO to breadboard negative column, then connected 220 Ω resistors to LEDs negative end point.
- In version 2, once I got the green LED to come on using GPIO commands then I started replicating the same process to the other LEDs both server side methods as well as front-end sliders. All server endpoints changed LED state, turned on LED and loaded the page with LED state as querystring.
- For the case of blinking LEDs until another command would stop it: I programmed a javascript fetch request to the server, coded an end point to handle it. The algorithm was essentially the following:
- Get lightsRelay state.
- If still “on” then proceed cycling through the LEDs.
- Then repeat step 3.1 above again recursively style not a loop.
- If “off” then proceed change lightsRelay state which in turn will break the cycle.
- Models:
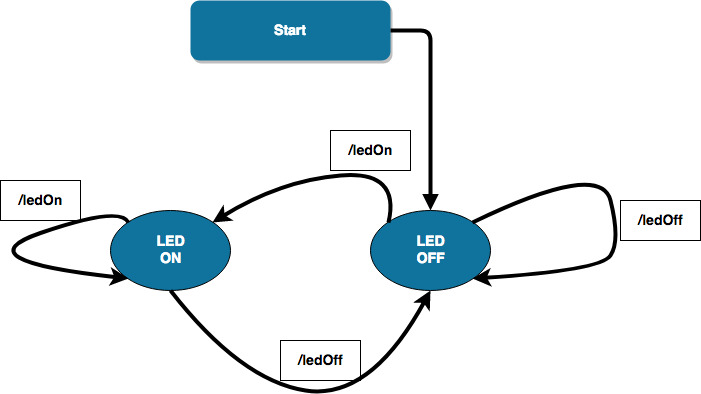
- Functionality: State machine as shown on the diagram below, this is a simplified form of the state machine as in reality I have created many endpoints to change the state machine for each led, but the basic concept is described below for each endpoint it reacts as the following diagram:
- On Start up, the machine will be on LED Off state
- Case “LED OFF”
- If system receives /ledOn then system changes to “LED ON” state.
- If system receives /ledOff then system remain in “LED OFF” state.
- Case “LED ON”
- If system receives /ledOn then system remains in “LED ON” state.
- If system receives /ledOff then system changes to “LED OFF” state.
-
- System Flow: See Appendix 1.
- Component and Schematic Diagram: The stoplight system is represented below by the following diagrams (Component and Schematic Diagram respectively)
Diagrams were facilitated by open source programs such as: Google drive plugin draw.io Diagrams and Fritzing.
- Program the code in the Arduino IDE
- Code the Arduino GPIO pins interaction with breadboard, resistors, LEDs accordingly to match the previous component/schematic diagram.
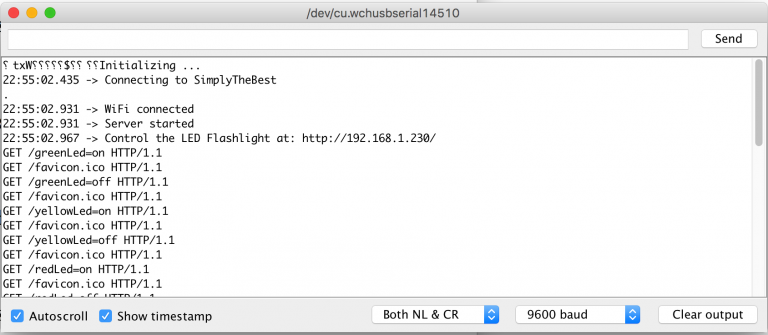
- Test/Debug constantly so the final product would be bug free. You can debug by first making sure the baud rate is set up in setup method. Then click on serial monitor icon
 , which then after compiling and uploading the code to the Wemos D1 mini you should see something similar to below screenshot:
-
- Use commands such as Serial.println(<variableToBeEvaluated>) to print out debug messages, so you can make sure what you think the code is doing is actually happening.
Thought Questions
- What are some key differences between developing this lab on a Raspberry Pi, and developing on Arduino? Using python on a raspberry pi allowed me to leverage my current knowledge and libraries I knew could do certain things simpler. While working on the arduino I noticed some limitations on the Arduino language, modified C, that I was less familiar with it and responding back from server requests was more difficult with Arduino, since I had to print every line back to client.
- What are the strengths and trade-offs of each of these platforms? Raspberry pi Strengths: Easier programming language (Python), easier libraries to use (Flask), better debugging tools. The trade-off is that it requires more computing resources to run python and its libraries. Arduino Strengths: from what I could tell it makes it programming a lot simpler than plain C, where I don’t need to compile and make file and upload program to the microcontroller, it makes that deployment task a lot simpler, one click of a button does all that for me. The language looks a bit more like Java and .Net it allows you to code in simpler data structures, then before deployment it process it and transform certain data structures to C level. It requires less resource compared to raspberry pi. The trade-off is that the learning curve is higher than raspberry pi and libraries to use may be less well known.
- How familiar were you with the Arduino platform prior to this lab? I had no previous experience.
- What was the biggest challenge you overcame in this lab? Because I didn’t know anything about the Arduino that obviously played a role in difficulty, so I had to read a few tutorials and videos on how to use it, debug, etc. The LEDs cycle was also difficult due to that I didn’t know how to easily have a different thread to run a certain task. So I had to think outside the box a bit to come up with a solution that would work for the requirements.
- Please estimate the total time you spent on this lab and report.
- 1 hour building and refactoring the circuit
- 8 hours coding the server and fixing bugs and getting acquainted with GPIO coding and setting up a Restful server using Flask Python library
- 3 hours working on the lab report using tools such as Google draw.io Diagrams and fritzing.
- 2 hours publishing a website with lab 1 instructions, mainly dealing with formats.
Certification of Work
I certify that the solution presented in this lab represents my own work. In the case where I have borrowed code or ideas from another person, I have provided a link to the author’s work in the references, and included a citation in the comments of my code.
— Lehi Alcantara
Appendix
Appendix 1: System Flowchart
Appendix 2: System Interface – Web Page
State: startup
State: greenLed=on
State: greenLed=off
Appendix 3: Server Monitor Output
Appendix 4: Arduino Code
(Available at https://github.com/ylehilds/arduinoStoplight)


Comments
Post a Comment